Full Test
The Full Test ROM contains useful tests to check that your Durango is working properly. Here you can find information about each test.
First of all, you need to know that you can switch between tests using the NMI button of your Durango, or F2 if you are running on Perdita Emulator.
Note
Rev. 1 of the Durango-X board has no debouncing on the NMI button. Depending on your particular tactile switch, hitting NMI may skip some tests. This will be addressed on the next Durango revision, and will never be an issue under emulation.
Durango Test
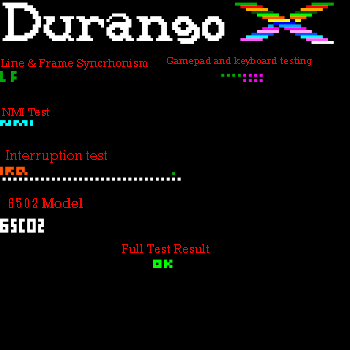
The first test checks that the built-in features of the Durango board are working. This test checks the following features:
- Zeropage test: exhaustive test of this essential memory area. A brief high-pitched chirp is heard.
- Address lines and mirroring test: looks for shorts on the CPU and/or MUX address lines. Hardly noticeable.
- RAM test: The whole 32 K is tested, which takes about one second. A moving pattern of vertical white bars can be seen on the screen.
- ROM test: the ROM checksum is verified and the Durango-X logo is shown if passed; otherwise,
ROMin the middle of a flashing screen will show up. - Line and Frame Blanking test: checks that these signals can be read by the CPU at
$DF88. If everything is OK, you will see the lettersL Fin green on the top left corner. If vertical blanking is not reported, theFwill show up in red; orange letters mean timing is way off, or even the horizontal blanking is not reported (usually much less of an issue). Some flashing on the screen may be noticed during this test. - Video mode port: Out of 8 bits, only 6 are actually functional; and just the upper 4 are needed to be readable. The colour of each bit is coded as follows:
- GREEN: required and readable (the 4 leftmost dots MUST be green)
- CYAN: readable but not required (some mods may allow this to happen)
- MAGENTA: not required and neither readable (usually the 4 rightmost dots, repeated below for convenience)
- RED: required but not readable. This is a malfunction in any case and will show up repeated below.
- NMI test: After the
NMItext appears, you have about 2 seconds to press the NMI button as many times as you like (a faint click will be heard every time), then a dot for every detected hit will be displayed. Without button debouncing, more dots than the number of hits will appear, but this is normal. Less dots than the number of hits is a malfunction. - Interrupt test: This test counts the number of interrupts in a time period (~129 ms); the screen will flash while doing it. If the number of interrupts differs from the expected one (32) give or take one, the test fails. Please check IRQ troubleshoot section for more information.
- 6502 model shows the exact variant of the 6502 CPU:
6502: Classic NMOS 6502 is not oficially supported, thus shown in red.65C02: original CMOS 65C02 (NoSMB/RMB/BBS/BBRopcodes).R'C02: 65C02 with Rockwell/WDC extensions (SMB/RMB/BBS/BBR).65816(in pink): 65C802/65C816, but the latter will need a suitable adapter.
- Full Test Result: If ALL the tests have passed, after a sweeping sound you can see an
OKtext in green.
Error codes
If any of the above tests fails, the ERROR LED will blink, while the screen will flash in sync. The pattern of flashes indicate the failed test.
| Test | flashing pattern |
|---|---|
| Zeropage | @........ |
| Address lines | @.@...... |
| RAM | @.@.@.... |
| ROM checksum | @.@.@@@@@ |
| VSYNC blanking | @..@@@@@@ |
| HSYNC blanking | @.@@.@@.@ |
| IRQ (slow) | @@@@..... |
| IRQ (fast) | @.@.@.@.. |
Where @ means LED on and . means LED off. Each state lasts ~0.3 seconds, for a total ~2.7 s. cycle.
GamePad Test
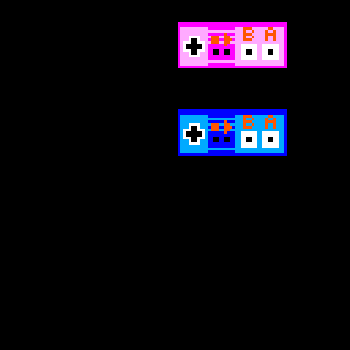
With this test, You can see if all the buttons are working properly on your gamepad. Each time you press a gamepad button, you can see the red dot on screen. Gamepad 1 is shown at bottom in blue, while Gamepad 2 is at top in pink.
Keyboard Test
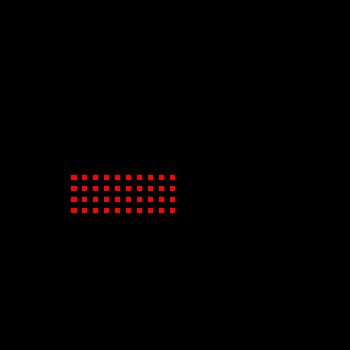
With this test, you can see if all the keys of your keyboard are working properly. Each time you press a key, you can see the corresponding dot on screen changing its colour from red to cyan.
Colour Test Chart
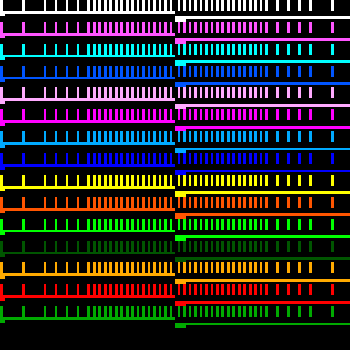
This test is intended for proper adjustment of RV127 and RV128 on Durango-X's main board. All colours are shown as a reference.
See Video Output calibration for details.
High Resolution Test Chart
This test is intended for proper adjustment of RV231 on Durango-X's main board, only affecting HIRES mode.
See Video Output calibration for details.